Friday, November 30, 2012

Chiffonade Cut


Hi folks! I'm a little pressed for time today so I thought I'd blog about an easy knife technique known as chiffonade. The chiffonade cut is used primarily for leafy greens and herbs like Lettuce, mint, sage, or basil. In fact, this is how I sliced my basil for the marinara sauce that I blogged about on Wednesday. It's a very useful cut to know and it's as easy as "1-2-3."


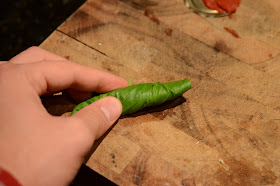
 Step 1 - Stack the leafs on top of each like I have pictured here to the right


Step 2- Tightly roll the leafs together.


Step 3- Using your knife, carefully slice down the length of the rolled up leafs.
Step 4 - That's it! You're all done. Separate your slices and you'll see the thin ribbon like strips of fresh herbs.

Wednesday, November 28, 2012

Creamy Marinia and Fettucini and "Moonstruck"

Who doesn't love a bowl of pasta with a side of toasted garlic and parmesan bread sitting in front of them. Just about any pasta dish is comfort food for me with a capital "C". There are so many varieties of jarred pasta sauces filling the shelves in our grocery stores theses days and they are often a "go to" or last minute weeknight meals. The truth is great pasta sauce recipe doesn't come from a jar and making it from scratch might be easier than you'd think. I might not have any Italian heritage in my family tree but I love to cook like I do. From pantry to dinner table, you can be serving this up in as little as 45 minutes!

2 tablespoons of olive oil
1 medium sized onion - chopped
4 cloves of garlic - chopped
About ½ of dry red wine (Merlot or Cabernet Sauvignon)
28oz can of diced or chopped Tomatoes 
3 tablespoons of tomato paste
1 teaspoon of sugar
9 leafs of fresh Basil
¼ teaspoon of dried oregano
pinch of red pepper flakes 
¼ teaspoon of kosher salt
1 bay leaf
¼ cup of heavy cream
1 box of dried Fettucini
Freshly grated parmesan cheese


We may be cooking Italian tonight but lets remember back to one of my first posts about our mise en place. Get you cans of tomatoes opened, the wine on hand, your onions and garlic chopped, and all of our spices out and readily available. Take a large sauce pan and coat the bottom with olive oil, it's about 2 tablespoons, and bring it to a medium heat. Add the chopped onion and gently saute' them for about 10 minutes until the become tender and slightly translucent. At this point, add the chopped garlic and stir together quickly and cook for no more than a minute - I can't stress enough how quickly garlic can burn and how it can really ruin a dish.

Once this step is completed quickly pour in the red wine to deglaze the pan. If you don't drink wine or have it on hand, chicken stock can be used as a substitute but wine is really the preferred ingredient. Most of the alcohol in the wine burns off in the cooking process but the wine adds a great depth of flavor to the sauce. Stir the liquid together with the onions and garlic for a few minutes until it begins to reduce. Add the dried oregano, the bay leaf, and red pepper flakes.

Add the can of tomatoes, the sugar, salt and pepper, and the tomato paste into the sauce and then stir together to combine everything. Turn the heat to medium low and all the sauce to simmer for about 20 minutes. Now is a good time to start your water to boil your pasta. No fancy tricks here, just a big pot of water, a lot of salt, and a touch of olive oil.

20 minutes later you should be dropping your pasta into it's boiling bath and it's time to finish off our sauce. Stir in the heavy cream and the fresh basil. Remove the bay leaf and season the sauce the taste. To make the easiest and best garlic bread on this side of the Atlantic, start by toasting a few slices of crusty Italian bread under the broiler until just browned. Cut one large clove of garlic in half and rub the garlic against the toasted bread - the heat from the bread will extract the flavorful oils in the garlic. Spread a little butter on top and some freshly grated cheese.

Once the pasta has cooked, drain the pasta and stir together with a little bit the sauce. Portion the pasta onto your plate and top a little more of the pasta sauce. Garnish with a little bit of freshly chopped basil and grated parmesan cheese and dinner is served!

This weeks movie is just as Italian as our dinner, the 1987 romantic comedy "Moonstruck." It's rare for a movie that's dubbed a romantic comedy to bring both of those elements into the film but "Moonstruck" really succeeded on this level. Cher stars as Loretta Castorini, a widowed woman who recently accepts another marriage proposal. Loretta sees marrying her fiance Johnny as a smart move, but as she admits to her mother Rose (Olympia Dukakis) she doesn't love him. When Loretta goes to share the news of the engagement with Johnny's brother Ronny played by Nicholas Cage, she finds a man who isn't exactly thrilled for his brother and his future bride. Things take an interesting twist when Loretta and Ronny soon develop a romantic relationship with one another and they find themselves in a difficult situation. Cher and Olympia Dukakis both received Academy awards for their comedic performances in this film and "Moonstruck" has become a new classic in the world of movies.

Monday, November 26, 2012

From Book Shelf to the Big Screen

It's common knowledge theses days, if a book grasps a large fan base - a movie version is soon to follow. Harry Potter, Lord of the Rings, The Lovely Bones, The Da Vinci Code, and The Twilight series are just a few of the more recent and popular titles. While these movies typically are massive blockbuster hits, they all too often fall short on the expectations of the reader after they've turned several hundred pages in a novel and now expect to see it all in a two hour movie. Being an avid reader, and obviously a movie buff, I have seen many book to movie adaptations and one film stands alone in my eyes as the best.

"The Girl with the Dragon Tattoo" was the 2011 film directed by David Fincher that was based off the massively popular novel by Stieg Larsson. When journalist Mikael Blomkvist (Daniel Craig) needs to lay low after having to reprint a story he published, he is contacted by the elder member of the Vanger family with a project he'd like Mikael's help with. To the rest of the world, Mikael is helping Henrik Vanger (Christopher Plummer) write his memoirs. Henrik's true intention however is to have Mikael try and solve a forty year old mystery to the death of his beloved niece Harriot. With little to no evidence and everybody that was on the Vanger's island home the day Harriot disappeared a suspect, Mikael expects to find the same thing everybody in the past has found - nothing. However when Mikael believes he may have discovered some new evidence to the mystery, he finds Elisabeth Salander (Rooney Mara) to assist him. As the two dive deeper into the mystery and learn more than any other investigators have in the past, they find horrors that nobody could have imagined. Rooney Mara was honored with an academy award nomination for her portrayal of Elisabeth Salander.

As I mentioned before, movies based on books rarely live up to the readers expectations. "The Girl with the Dragon Tattoo" was made with great attention to detail and fellow readers of the novel should enjoy the film. Of course we are still talking about a very long and in depth novel being shrunk into a film in 158 minutes so naturally there are still some differences between the two. With that being said, I highly recommend the film to both the people who've read the fantastic novel and those who haven't. Here is the trailer to the film, hope you enjoy it!

Friday, November 23, 2012

Perfect Green Beans

A side of green beans is a perfect vegetable to have with any meal your serving up during the holidays or throughout the rest of the year. They're nutritious, quick and easy to prepare, and readily available all year long. There is a certain procedure though in cooking green beans to ensure they keep their bright green color and stay nice and crisp rather than dull, dingy, and waterlogged. A little bit of sauteed garlic is a great flavor to compliment the green beans.

For a serving 4 people

About a ½ lb of fresh Green Beans
2 cloves of chopped garlic
1 tablespoon of butter
A drizzle of olive oil
¼ teaspoon of kosher salt
Freshly cracked pepper

Trim the ends off of your green beans and wash thoroughly. In a large bowl, add ice and very cold tap water so that it's about half way full. Bring a pot of water up to a rolling boil, season the water with a little salt, and submerge the green beans into the water for no more than 4 to 5 minutes. Drain the green beans and immediately place them in the bowl off ice water. Taking the green beans straight from the boiling water to the ice water will shock them by stopping the cooking process and they'll keep their fresh green color. Leave the green beans set in the ice bath for about a minute or so, then remove and allow them to drain.

Chop the two cloves of garlic and in a sauté melt together the butter with a little bit of olive oil.Sauté the garlic for 1 minute and then add the green beans straight into the sauté pan. Toss together to make sure the green beans get and even coating of the butter and oil mixture, add another drizzle of olive oil if not. Cook just until the green beans are heated through. Season with the salt and a few fresh cracks of black and serve along side any main dish.

Wednesday, November 21, 2012

Baked Haddock and Old Bay roasted Red Potatoes and "The Blind Side"

Most of us wait 365 days a year for Thanksgiving dinner and are still enjoying its leftovers the day after. Come the weekend after Thanksgiving the last thing I want to cook or eat is anything resembling a turkey. Baked haddock is about as far from poultry as you can get and is a quick and easy dinner for any night of the week. Haddock is very mild fish so even if you're typically not a fan of seafood you might really enjoy this dish. Roasted red potatoes with old bay seasoning is the perfect side dish.

2 Haddock fillets (If frozen allow them to thaw completely before baking)
¼ teaspoon Old Bay Seasoning
2 tablespoons of softened butter
Juice of half of a lemon
About a ½ of a cup of seasoned Panko Bread crumbs
Freshly chopped Parsley

4-5 small red potaoes
¼ teaspoon Old Bay Seasoning
Kosher Salt
Olive oil
Pre-heat oven to 425 degrees

The potatoes will take longer to cook than the fish so we'll start with them. Scrub the potatoes under cold water and cut into quarters. In a mixing bowl - toss the potatoes with the olive oil and the old bay. Arrange on a baking sheet and sprinkle with just a little bit of kosher salt. Bake in the oven for about 45 minutes or until the potatoes are tender and have browned.

While the potatoes are baking prepare the fish. Mix together the softened butter, old bay, lemon juice, panko bread crumbs, and parsley. Drizzle just enough olive oil on the bottom of a baking dish to coat. Place the haddock fillets in the baking dish and evenly spread the butter and panko mixture over the two fillets. Bake the fillets in the 425 degree oven for 20 minutes. Test the fish by gently pulling at the side with a fork, when done it should easily come apart and be flaky. Serve hot along side the roasted potatoes.

A few weeks back, a reader asked if I knew any movies based on kindness. In spirit of Thanksgiving and the start of the holiday season I felt that it was a great time to suggest this week’s movie “The Blind Side”. Based of the incredible true story of Michael Oher, “The Blind Side” is the 2009 film starring Sandra Bullock, Quinton Aaron, and Tim McGraw. Sandra Bullock plays Leigh Anne Tuohy, an interior designer in Tennessee. When Leigh Anne and her husband Sean (Tim McGraw) find Michael walking alone at night in the cold, they invite him into their home. Michael was homeless at the time with his father dead and his drug addict mother no where to be found. The Tuohy’s take in the young man and treat him like a member of their family. Michael Oher soon changes the life of the Tuohy family in ways they never imagined. Sandra Bullock gives a heart felt performance and would go on to win the academy award as best actress for her portrayal of Mrs. Tuohy.

“The Blind Side” is truly an extraordinary story and one that will pull on the heart strings on more than one occasion. Though part of the movies plot is Michael’s ability to play football and the success he earns doing so, you do not have to be a fan or know anything about the game of football to enjoy this film. It’s a story about kindness, love, and family. Something we all need to appreciate every day, not just around the holidays. With that, I hope you enjoy today’s recipe and movie – Happy Thanksgiving everybody! Here is the trailer for "The Blind Side"

Monday, November 19, 2012

Movie Preview - "Oz The Great and Powerful"

Arguably one of most recognizable and loved films of all time is the 1939 classic, "The Wizard of Oz". Few people haven't seen the film and know of Dorothy's magical journey to the wonderful world and Oz and her battle with the evil Wicked Witch of the West.

Disney has chosen to make a prequel to the classic film we all know and love called "Oz the great and powerful" and is set to be released on March 8, 2013. As the title suggest, the story of the film will focus on Oz himself and how he came to find the land somewhere over the rainbow long before Dorothy and Toto are whisked away in the twister. James Franco stars as Oz, a young magician in Kansas who, like Dorothy in the original film, finds himself caught int the path of a violent tornado and brought to wonderful world of Oz. Mila Kunis, Rachel Weisz, and Michelle Williams also hold starring roles in the upcoming picture.

I'm curious, how do you all feel about this movie? Are you at all interested or do you see this as just a lack luster and CGI (computer generated image) filled prequel to a movie that is nearly 75 years old? To be honest, I think if this film is handled the right way and doesn't get too far out of hand it could be rather enjoyable. When you think about it, there is quite a bit of room to tell the story about Oz and how the Wicked Witch kept the land in fear or turmoil before Dorothy and her friends would save the day. The trailer for the film shows promise but are they messing with a timeless classic? Only time will tell but for now here is the official trailer for the film - take a look and let me know your thoughts.


Friday, November 16, 2012

Lemon and Raspberry Tart

Looking for something a little different to serve after your holiday meals this year? How about a Lemon and Raspberry tart with a short bread cookie crust? Quick and easy to make, this dessert will be sure to impress everyone at the table! Creamy lemon curd with raspberry swirls and topped with fresh raspberries. You might even impress yourself with this one!


2 cups of crushed cookie crumbs (About an 9oz bag of store bought cookies - Short bread are recommended.)
5 tablespoons of melted butter
¾ cups of freshly squeezed lemon juice (about 3 or 4 lemons)
1 tablespoon of lemon Zest
¼ teaspoon of vanilla extract
1½ cups of Sugar
1½ sticks of butter cut into pieces
5 large eggs
A pinch of kosher salt
3 tablespoons of raspberry preserves
1 small container of fresh raspberries


Preheat your oven to 350 degrees

Prepare the crust by crushing the cookies and mixing with the melted butter. Dump the mixture into a tart pan and press firmly along the bottom and the edges. If you don't have a tart pan you can use a pie pan though you may need to increase the amount of cookie crust depending on the size of you pie plate. Place the crust in the oven and bake for 10 to 12 minutes. Remove the crust from the oven and lower the heat to 325.

In a medium sized sauce pan add the fresh lemon juice, lemon zest, sugar, vanilla, and the eggs and whisk together until everything is combined. Continue to whisk the mixture constantly over medium heat for 10 to 12 minutes. The mixture will start to thicken and have a jelly like consistency. Remove from the heat and whisk in the 1½ stick of cut up butter until the butter has melted. Pour the lemon filling into the prepared crust.

Next, take about 3 tablespoons of raspberry preserves and heat it in the microwave for about 15 to 20 seconds (Just enough so that the preserves become loose and more liquid like.) Taking a small plastic bag, pour the preserves into the bag, squeeze out any excess air, and seal the top. Using a pair of scissors, snip out a small portion of the corner of the bag. Take the bag and make three circles with the preserves over the lemon filling - one large one around the outer edges, a slightly smaller one towards the middles, and a small circle in the center. Don't worry if it's not perfect!

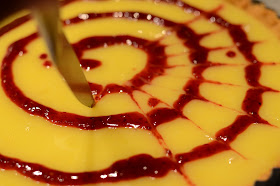
To create the swirled spider web-like pattern, take either a knife or a tooth pick and just barely insert into the center of the tart. Gently pull back through both the lemon filling and the raspberry preserves and you'll create the pattern shown. Looks fancy and complicated but it really can't get any easier than this.

Place into the preheated 325 degree oven and bake for 15 minutes. Garnish with fresh raspberries and allow the tart to cool completely before cutting.


Wednesday, November 14, 2012

Sliders and Fresh cut Fries and "The Prestige"

I have to admit, I have a major weakness for a good cheeseburger. Nothing beats a juicy burger with melted cheese hot off the grill or the pan. Add a side of salty french fries, a crispy dill pickle, and I'm in foodie heaven my friends.

In case you don't know, sliders are just mini burgers. They're a great for party's or as a weeknight meal. The small burgers easily accommodate someone with a large or small appetite and kids especially seem to love these mini burgers. The trick to any good burger is not going too extreme with the seasoning and not compacting the meat so much that they look more like a hockey puck than a burger patty.

I typically plan on serving 3 sliders per person. 1 pound of ground beef will make 6 sliders so adjust the amount you'll need on how many you plan on making. I made 12 sliders so there fore I needed about 2lbs of ground beef.

Fore 12 Sliders (serving 4)

12 small slider rolls
2lbs of ground beef
1/2 pound of preferred cheese sliced then
2 tablespoons of very soft butter
Kosher salt and Black Pepper
Desired toppings and condiments

For the Fries

5 large potatoes
Peanut or Vegetable oil
Salt and Pepper

The first step in preparing this meal is getting the potatoes peeled, cut, and washed. Using a sharp knife, or a french fry cutter, slice the potatoes into evenly sized fries and rinse them under cold tap water to rinse off the starch in the potatoes. Soak the fresh cut fries in a large bowl filled with water and then allow them to dry on a clean dish towel or paper towels. Make sure the potatoes are completely dry before dropping them in the oil - water and hot oil don't mix!!!

The trick to perfect fries is frying them twice. The first fry will last about 5 to 6 minutes as we're pretty much cooking the potato all the way through. We then drain the fries and allow them to cool before dropping them back down into the oil for a quick flash fry to give them that nice crispy texture. To help make sure everything gets done around the same time, we'll do the first fry now and the second once the sliders are finished. I'm lucky enough to have a small deep fryer that sits on my counter top but using any pot will work for frying.

You'll want to fill either your deep fryer to the recommended fill line or your pot about 3 to 4 inches full of vegetable or peanut oil. Heat the oil around 350 degrees and submerge the fries in the hot oil in small batches. You don't want to crowd the fries or else they will lower the temperature of the oil and the fries won't cook evenly. Remember, only about 5 to 6 minutes for the first fry and then, using a slotted spoon, tongs, spider, or other kitchen tool, carefully remove the fries and allow them to drain on some paper towels.


To form the sliders, carefully take a small portion of ground beef and very gently form it into the shape of a burger. This is the key here, if you use too much pressure you'll make a dense burger. Apply just enough pressure with your hands to mold the beef so it stays together. Whatever you do just don't start pressing down with your palm or rolling them into little meat balls.

Take about 2 tablespoons of softened butter and spread a little on the top of each burger. Season with kosher salt and fresh black pepper and that's it.

The weather wasn't cooperating with me the other day so I wasn't able to fire up the charcoal grill. Luckily you can still make a delicious burger indoors no matter what mother nature decides to do. Pre-heat a large frying pan, preferably a cast iron, over medium heat.

Once the pan is nice and hot, carefully place the burgers in the pan buttered side down. You should hear and see the burger sizzle the moment it hits the pan. It's important not to crowd the burgers in the pan, no more than 4 or 5 at a time, and don't move them around.

We're searing the burgers here and they need time to get that nice brown crust we are looking for. I know it's tempting but don't flip or slide these little guys around just yet. It will take 3 to 4 minutes on the first side depending on how thick the burgers are. Once you see that the meat is turning brown around the edges it's time to carefully flip.


Now for a little trick I like to use. Take about a tablespoon of water and pour it in the middle of the pan and quickly put a lid on. The steam caused by the water hitting the hot pan will help keep the burgers juicy as well as helping the center of your burgers cook through. If you're like me, I love my burgers just slightly pink and juicy on the inside. Once you've flipped the sliders cook for another 2 to 3 minutes to enjoy a medium cooked burger.
Next, top each burger with a few slices of cheese and put the lid back on - the steam will help melt the cheese to perfection!! Take the sliders out of the pan and place them straight on the bun or you can keep them warm in the oven if you have more to make. Just place the sliders on a baking sheet and place in an oven that has been heated to about 175 degrees - just enough to keep them warm and not cook them any further.


Now that the sliders are ready, it's time to finish the fries - don't worry it'll happen fast. Drop the par cooked fries back down into the hot oil for about 2 to 3 minutes or until you start to see that nice golden brown. Remove the fries one final time from the hot oil and place them on a few paper towels to drain. Give them a generous sprinkle of salt and a little pinch of black pepper and your tiny sliders have met there soul mates. Since I made one of my favorite meals this week, I thought I'd recommend and review one of my favorite movies - "The Prestige"

"The Prestige" follows the story of two magicians set in London near the end of the 19th century. Starring Christian Bale as Alfred Borden and Hugh Jackman as Robert Angier, the two young men are friends working as assistants for a magician's act. Michael Caine also stars as the engineer of the devices used by magicians to fool and entertain an audience. While the two men start off as friends, a horrible tragedy soon divides them and each begin on the path to becoming the top magician in London.

The former friendship has now become a bitter and even dangerous rivalry between them. Each men try to secretly sabotage their acts and often disguise themselves in each others audience to try and learn each others secrets . One night, while Angier sits in Borden's audience disguised as a common spectator, Borden debuts a magic trick that Angier is amazed by and calls it "The greatest magic trick I've ever seen."

Robert then becomes obsessed with his method and will stop at nothing to understand how it's done and how to make an even better act. Angier will soon find his obsession taking over his every thought and lead him on a journey where he will learn things he never expected. "The Prestige" is an absolute gem of a film that writer/director Christopher Nolan wrote based of a novel by the same name. It's a fast based movie that will take hold of you from start to finish and. Once the final curtains close I wouldn't doubt that you'll want to watch it again.

"The Prestige" is one of my very favorite films and easily finds it's way into my top 10 list of favorite movies. I'm posting the trailer below for you to watch...but I must warn you! It's very hard to watch this preview and not instantly want to watch the entire film. Even myself, who's watched this film dozens of times still can't resist wanting to do so. Like any good magic trick, you won't want to take your eyes off of it for a second. As the opening line of the movies asks, "Are you watching closely?"

Monday, November 12, 2012

Movie Review -"Skyfall"

Good morning everyone! Hope you all had a nice weekend! It was a fairly uneventful one for me but I did find the time to head to the movie theaters and see one of the seasons most anticipated new films, "James Bond 007 Skyfall".

The movie opens up with a bang as a hard drive containing the identities of all the secret agents in the MI6 data base is stolen. Bond and a fellow agent are quickly on the thieves trail to retrieve the device at all costs. When their efforts fail, nobody within the organization is safe - especially "M" herself . A ghost from her past arises with a vengeful plot against her and all of MI6. "M" must rely on 007 to hunt down and neutralize the threat before it's too late. Still recovering from a nearly fatal accident, Bond's physical endurance and his loyalty to "M" will be tested as he faces a terrorist who knows all too well the methods of MI6 and their leader.

Now in his third film portraying the famous secret agent, Daniel Craig owns the role of Bond and plays the part perfectly. Judi Dench, Javier Bardem, and Ralph Fiennes also star as director Sam Mendes takes on his first action movie. Mendes brings new life to the franchise blending elements of past Bond films and bringing in new concepts to keep the film fresh and modern. The exciting opening scene, classic 007 moments, and a top notch screen play that builds an epic story make this film truly enjoyable for newcomers and fans of the series alike.

I can easily say "Skyfall" was the best James Bond movie I've seen in recent years.While it may not have as many over the top gadgets or scandalous love scenes as some of the other installments in the 007 series, Skyfall still delivers as an epic film worthy of the Bond franchise. It certainly merits going to your local theater and enjoying on the big screen. "Skyfall" did not disappoint and I eagerly await the next installment of the timeless movie series. Check out the trailer posted below.

Friday, November 9, 2012

My oh my! Pumpkin Pie!


Let’s face it, no Thanksgiving dinner table is set without a famous pumpkin pie waiting for us after our annual turkey feast. Pumpkin pie has been my favorite since I was a small boy from when I’d spend my days at my grandma's house. I was a creature of habit and every time she’d baby sit me she’d have a slice of pumpkin pie waiting for me after I finished my lunch. Grandpa was never too far to have a slice with us either! 26 years later not much has changed. Just last week I was visiting and had a bowl of clam chowder for lunch and a slice of pumpkin pie for desert. My Gram and I share a lot of things in common, our love for food being one of them -especially pumpkin pie.

Over the years we’d take note if ever we saw someone’s recipe for a pumpkin pie that was different than the family recipe. I’d make a pie from a new recipe and take a slice over to her or vice versa. Some we thought were good, others not so much – let me tell you it was not an easy job tasting all those pies….yeah you’re right – who am I kidding??? Anyhow we’ve taken inspiration from the outside and applied them to our recipe and the result is one darn good pumpkin pie!

Pie Crust

2 sticks of very cold butter
3 cups of flour
1 tablespoon of sugar
1 teaspoon of kosher salt
6 to 8 tablespoons of ice water

For the Filling

3 large eggs
2 egg yolks
1 cup of sugar
1 cup of heavy cream
1 cup of half and half
1 tablespoon of vanilla
½ teaspoon of cinnamon
1 teaspoon of kosher salt
¼ teaspoon of freshly grated nutmeg
14 oz canned pumpkin
1 large freshly baked yam


Pre-heat your oven to 375 degrees. Poke a few holes in the yam and place the yam on a baking tray with tin foil. Bake for an hour or until tender. Remove from the oven and let cool. The yam may seem odd in a pumpkin pie but it seems to make the pie more pumpkin-y!

While the yam is baking, we can prepare the pie dough. Yes you can use store bought ready pie crusts, I often do myself but sometimes it’s nice to have the whole thing made from scratch. If you have a food processor this step will be a lot easier and faster. Just add your flour, butter, salt, and sugar, and pulse until everything is blended and slowly add the vodka and ice water until your dough comes together. Don’t have a food processor? Me either but it’s still fast and easy. In a large mixing bowl - add the flour, salt, and sugar. Use a pastry cutter or a whisk to break up the butter into the flour. 

The flour should be coarse and the butter should be broken up into tiny pieces like in the picture. Add about 5 tablespoons of ice water. Actually use ice water here, I fill a small bowl with ice and pour water over and dip my tablespoon right in – very important that it’s cold.

I mix by hand here until the dough starts to form together into a ball. If the dough is still sticky and you need more water, add it a tablespoon at a time. Once the dough is ready it will form into a ball - cut the dough ball in half and roll them out with a floured rolling pin onto a lightly floured surface. Roll the dough out so they fit into a 9 inch pie plate with enough dough that it hangs over the edges. Carefully press the dough along the sides and the bottoms and trim some of excess dough hanging off the edges. You can be all nice and fancy with the edges but I usually just leave it the way it is - I like my pies to look rustic. Place the pie dough in the refrigerator for about 20 minutes. Once the pie crusts have chilled, poke a few wholes on the bottom of the crust with a fork. This will help the steam escape when we par bake them. Bake the crusts at 375 for about 10 to 15 minutes and set aside while we prepare the filling.

Start the filling by whisking the eggs and egg yolks together with the heavy cream, half and half, and the vanilla in a large mixing bowl until they’re just combined. Scoop out the yam you baked early and mix that into the pumpkin, the sugar, cinnamon, nutmeg, and salt – add this to the cream and eggs. Pour the mixture into a sauce pan and cook over medium heat for about 15 to 20 minutes mixing it the entire time. Make sure everything is nice and smooth. My gram and I found one recipe that said by cooking the pumpkin mixture a little bit before baking helped with the pies texture and prevented the pie from cracking while it bakes. It really does make a big difference.

Place the pie shells onto a large baking sheet. Pour the pumpkin mixture evenly into the two pie shells and bake for the first 10 minutes at 400 degrees and then lower the heat to 325 and bake for an additional 45 minutes to an hour. The pie is done when it holds firm when you lightly shake it and a knife comes out clean when you stick it in the center. Allow the pies to cool completely before serving. Fresh whipped cream never hurt anything here either!!

Wednesday, November 7, 2012

French Onion Soup and "Midnight in Paris"

It's been a chilly to start to November here in the north east but you won't hear me complain. One of my favorite things to make for dinner on a cold day is French onion soup. It's a comfort food for me, the savory broth, melted cheese, crispy bread, and the the sweet caramelized onions together are a flavorful and satisfying  combination. If you've never made this at home for yourself you might be surprised at how easy the dish is to make. A nice bowl of French onion soup, maybe a glass of dry red wine, and you'll fell like walking the streets of Paris at midnight. 

French Onion Soup - recipe serves 5-6

6 large onions sliced
6 tablespoons of butter
1 tablespoon of olive oil
2 cloves of chopped garlic
2 bay leaves
1 sprig of fresh thyme or a teaspoon of dried thyme leaves
1/2 cup of dry red wine (Use what you like to drink - I use Cabernet Sauvignon)
2 tablespoons of flour
3 14oz containers of beef broth
salt and pepper
12-15 thin slices of Swiss Cheese
1 crispy french baguette

Prep the onions by peeling and and slicing them. To slice them, cut the onions in half and then cut thin slices from the halves so they look like half moon shapes. It's going to look like a lot but trust me they will cook down. Add the butter and olive oil in a large soup pot and melt over a medium heat. Once the butter and oil have melted together, add the onions to the pot and stir them to make sure they're all covered with the butter and oil.

Cover and cook the onions over medium heat for about 10 to 15 minutes giving them a stir about half way through to make sure nothing is sticking. This step is allowing the onions to sweat, and just like when we sweat we release water and the onions will do the same thing. The onions will start to soften and there will be a fair amount of water in your pot. uncover and turn the heat down to low. Next, add the time....and I don't mean thyme I mean TIME!!

Time is the most important step in making French onion soup and there isn't a substitution for it. To properly caramelize onions you have to cook them low and slow for about an hour. After about an hour or so, the onions will turn very brown and you'll be shocked out how much they've reduced by. Turn the heat back up to medium and add the red wine, bay leaves, chopped garlic, and the thyme. Stir together and cook until the wine begins to reduce and sprinkle the flour over the onions.

You want to stir the onions constantly for a few minutes, about 3 to 5, so you cook off all the raw flour. Pour in the beef stock and bring the soup to boil. Once it's come to a boil reduce the heat back down to low and bring the soup to a simmer. In case you're not sure, when it's boiling you'll see bubbles rise to the surface where as a simmer you should only see a constant flow of steam rising from the pot. Allow the soup to simmer over the low heat for at least an hour.

After the soup has simmered, season with salt and 1/2 teaspoon of pepper and  taste it!! I'm not going to give you a set amount of salt to use here because it honestly depends. Caramelized onions can be sweet so you do need a fair amount of salt, I usually start with a teaspoon and go from there. It all depends on how sweet the onions you used were and to your taste preferences. I've made this soup more times than I can remember and I never seem to use the same amount of salt.

Preheat the broiler on your oven to high. Fish out the two bay leaves and the stem for the thyme if you used fresh. Ladle to soup into crocks or some other kind of heat proof mug or bowl. Float two or three slices of baguette on the surface and cover with the cheese. Put under the broiler and keep a close eye on it. Once the cheese has melted and turned golden brown in some areas carefully remove. I like to add some fresh chopped parsley or scallions on top if I have them on hand. Either way, serve the soup hot and dig in!

Sorry for the sub-par photographs in this post everyone. I did have a quite a few pictures to show you the process of caramelizing the onions and a nice shot of the final result. For some reason my memory card on my camera acted up and I had to re-format it which resulted in loosing the photos. My friend and I, who is quite the cook himself, always send each other pictures of our dinners via text messages so luckily I had at least these two on my phone to share with you all. Anyway, time for the movie of the week - Midnight In Paris.

Midnight in Paris is the 2011 movie written and directed by the great Woody Allen. Owen Wilson plays a young American writer named Gil who is on vacation to Paris with his fiance Inez (Rachael McAdams) and her parents. Currently a successful screenwriter, Gil's true desire is write novels like his idol, Ernest Hemmingway. Gil gets captured by Paris' charm and sees the magic of the city as the perfect place for he and Inez to move to so he can find the inspiration needed to finish his book. Inez fails to see the same aspects of the city and she can't get back to Beverly Hills soon enough. One night after dinner, Gil passes on the invite from Inez's friends to go dancing and decides to walk alone back to their hotel. Unfamiliar with the city and a few glasses of champagne, Gil looses his way but in the same sense might have found what he's looking for. At the stroke of midnight, Gil somehow finds himself transported back to the 1920's when Paris was home to some the greatest writers, musicians, and artists the world has ever known. Midnight in Paris is a very charming film and one I think you'll all enjoy.


Monday, November 5, 2012

Movie Review - "The Artist"

Good Monday morning to all of you, hope you had an enjoyable weekend. Saturday night I was scrolling through some of the movies that Netflix allows you to watch instantly and I was surprised and intrigued to see "The Artist" starring Jean Dujardin, Berenice Bejo, and a cute little Jack Russell.

In case you have no knowledge of this film, it's a black and white silent film and it's the reigning winner of Best Picture at the Academy Awards. Wait....did I just say this was a silent film? Indeed, if you're looking to hear the same old cliché dialogue that seems to be used over and over again in romantic comedies you won't find it here. This is one of the best movies I've ever seen.

Set in the late 1920's out in Hollywoodland California, the story revolves around the life of a silent film actor named George Valentin (Dujardin). At the top of his game, George is the leading man in movies and is loved by all. While at a premier for a film, a young woman named Peppy Miller (Bejo) gets shoved from behind in the crowd and accidentally bumps into George. There is an immediate connection between the two and Peppy soon finds herself working alongside George on a movie set. 

George Valentin loves the movies he makes and wouldn't change a thing. However, the studio and the rest of Hollywoodland don’t feel the same way as the technology arrives which will allow actors to record their speech on film.Talkies are the new crave of the industry and the studio no longer sees the point to make films where the audience can't hear the actors speak. When George refuses to make talkies, he is soon forgotten and Peppy Miller becomes the face of the films. Though Peppy urges him to take on new talkie roles with her, George will risk everything he has to continue to make the kind movies he loves. The Artist is a touching love story not just between a man and a woman - but between a man and film making.

In a day when movies are far too often filled with computer generated scenes and endless over the top special effects, it's easy to lose sight that movie making is an art form. I have to say I was a skeptic of this film when I first heard of it. I didn't think it was possible to sit through a full length movie and never hear a word of dialogue until the final thirty seconds. The use of music, camera angels, and top notch acting makes this film the incredible experience that it is. I cannot urge you strongly enough to watch this movie no matter what your thoughts about it might be. "The Artist" is cinema magic and it's a prime example of whythe world fell in love with motion pictures nearly 100 years ago.

Friday, November 2, 2012

Twice Baked Yam Casserole

Hi all, and happy Friday to you. I first would like to send my apologies to anyone who stopped by Wednesday expecting to see my usual dinner and a movie post. The affects of hurricane Sandy reached all the way out here in North Eastern Pennsylvania and I was without power for a couple days. I would also like to take this time to send my thoughts out to any of you or your family members who were caught in the storms path.


Autumn may not officially end until late December, but as far as I’m concerned once all the leaves have fallen the season has ended for another year. It’s hard to believe but Thanksgiving is less than three weeks away!! Christmas and the rest of the holidays will be sneaking right up on us as well. For the month of November and December, as my Friday food posts I’m going to share with you some of my favorite side dishes and deserts to go with any holiday meal. We’re going to start with one of my new favorites, Twice Baked Yam Casserole.
 
Serves 12 (I usually use do 1 large yam per two people so adjust the recipe to however many you are serving)

6 large yams
6 tablespoons of butter
6 tablespoons of brown sugar
6 tablespoons of heavy cream
½ teaspoon of cinnamon
¼ teaspoon of nutmeg
1 teaspoon of salt
1 cup of chopped walnuts or pecans (optional)
1 bag mini marshmallows - If you have large marshmallows already at home just cut them into small pieces.

Pre-heat your oven to 375 degrees and wash the yams thoroughly. Take a fork or a sharp knife and carefully poke a few wholes into the yams. This will help them bake faster and will allow the steam to escape. Line a baking tray with tin foil and place the yams on top. Bake the yams for about one hour or until they are very tender when your piece them with a fork. The timing all depends on the actual size of the yam. Remove from the oven and allow the yams to cool slightly.

Once you can handle the yams, remove their skins and place them in a large mixing bowl. Add the butter, brown sugar, heavy cream, cinnamon, nutmeg, and salt. Use a hand mixer or potato masher to whip all the ingredients together. Season to taste.

Spread the whipped yams into a lightly greased 9x12 baking dish (Smaller or larger depending on how much you’re making.) Sprinkle the chopped nuts over top and then add the mini marshmallows. I add just enough so that the top is almost covered but you can still see the yams underneath it. Place the baking dish back into the oven and lower the heat to 350. Bake for about 10 to 15 minutes or until the marshmallows are golden brown.